参考资料
【Dlib】人脸检测、特征点检测、人脸对齐、人脸识别 深度学习与人脸识别之-脸部分割与校正 github项目FaceSegmentation http://dlib.net/face_alignment.py.html 知乎问答
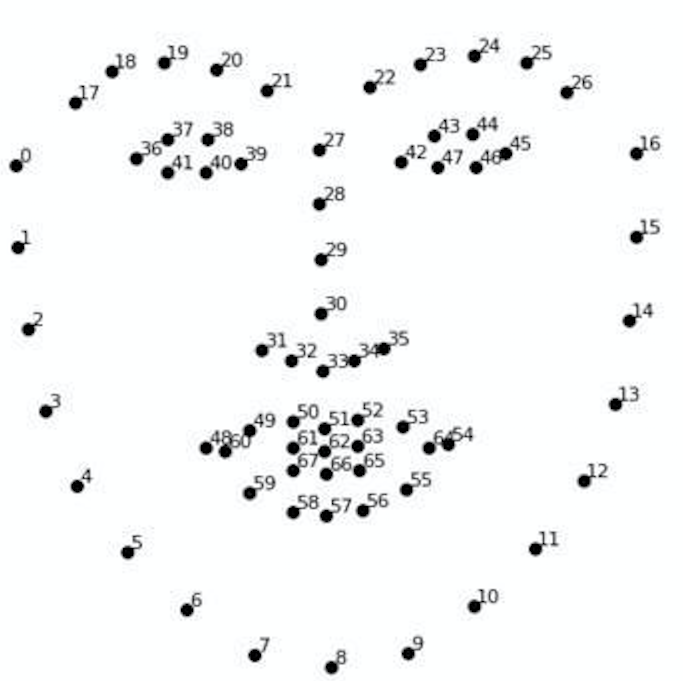
关键点检测 首先获取模型,下载地址在这 ,我使用的是获取脸部68个关键点的模型shape_predictor_68_face_landmarks.dat 68关键点位置示意图如下:
用dlib人脸检测器检测出人脸,返回的人脸矩形框
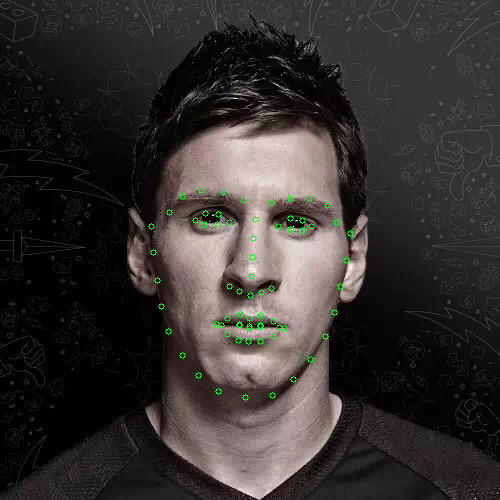
对检测出的人脸进行关键点检测并用圈进行标记
将检测出的人脸关键点信息写到txt文本中
predictor_model = ‘shape_predictor_68_face_landmarks.dat’
cv2读取图像 test_img_path = “input/Messi.jpg”
取灰度 img_gray = cv2.cvtColor(img, cv2.COLOR_RGB2GRAY)
人脸数rects(rectangles) rects = detector(img_gray, 0)
for i in range(len(rects)):
    # 68点的坐标
    pos = (point[0, 0], point[0, 1])
    print(idx+1, pos)
    pos_info = str(point[0, 0]) + ' ' + str(point[0, 1]) + '\n'
    file_handle.write(pos_info)
    # 利用cv2.circle给每个特征点画一个圈,共68个
    cv2.circle(img, pos, 3, color=(0, 255, 0))
    # 利用cv2.putText输出1-68
    #font = cv2.FONT_HERSHEY_SIMPLEX
    #cv2.putText(img, str(idx+1), pos, font, 0.5, (0, 0, 255), 1, cv2.LINE_AA)
file_handle.close()大致过程如下:先用人脸检测器获取到人脸矩形框rectangles,再用68点shape模型获取`full_object_detection`对象。最后将关键点标记出来,并写入文本中。 `rects 1 2 3 4 5 ```python predictor = dlib.shape_predictor(predictor_model) predictor(img,rects[i]).parts() predictor(img, rects[i]).part(1)
predictor返回的是一个full_object_detection对象,通过parts()可以获得所有关键点的位置,通过part(idx)idx从0开始,可以获取某个关键点的信息。
脸部分割 两种方式:矩形框分割人脸和 不规则形状分割人脸
矩形框分割人脸 可以采用dlib.get_face_chip()来分割人脸
1 2 3 4 5 6 7 8 9 10 11 12 13 14 15 16 17 18 19 20 21 22 23 24 25 26 27 28 29 """ 代码功能: 1. 用dlib人脸检测器检测出人脸,返回的人脸矩形框 2. 对检测出的人脸进行关键点检测并切割出人脸 """ import cv2import dlibimport numpy as nppredictor_model = 'shape_predictor_68_face_landmarks.dat' detector = dlib.get_frontal_face_detector() predictor = dlib.shape_predictor(predictor_model) test_img_path = "input/Messi.jpg" img = cv2.imread(test_img_path) img = cv2.cvtColor(img, cv2.COLOR_BGR2RGB) rects = detector(img, 0 ) faces = dlib.full_object_detections() for i in range (len (rects)): faces.append(predictor(img,rects[i])) face_images = dlib.get_face_chips(img, faces, size=320 ) for image in face_images: cv_bgr_img = cv2.cvtColor(image, cv2.COLOR_RGB2BGR) cv2.imwrite('output/Messi_clip.png' , cv_bgr_img)
Dlib检测出的脸部区域对于下巴和额头区域会做过多的裁剪,并且分割使用的是矩形框。 分割结果如图
不规则形状分割人脸
先用dlib等打点工具把人脸最外层的landmark点打出来,然后利用opencv的convexhull得到凸包然后就可以抠出人脸区域了.
python代码(获取人脸的掩模)
1 2 3 4 5 6 7 8 9 10 11 12 13 14 15 16 17 18 19 20 21 22 23 24 25 26 27 28 29 30 31 32 33 34 35 36 37 38 39 40 41 42 43 44 45 46 47 48 49 50 51 52 53 def get_image_hull_mask (image_shape, image_landmarks, ie_polys=None ): if image_landmarks.shape[0 ] != 68 : raise Exception( 'get_image_hull_mask works only with 68 landmarks' ) int_lmrks = np.array(image_landmarks, dtype=np.int ) hull_mask = np.full(image_shape[0 :2 ] + (1 ,), 0 , dtype=np.float32) cv2.fillConvexPoly(hull_mask, cv2.convexHull( np.concatenate((int_lmrks[0 :9 ], int_lmrks[17 :18 ]))), (1 ,)) cv2.fillConvexPoly(hull_mask, cv2.convexHull( np.concatenate((int_lmrks[8 :17 ], int_lmrks[26 :27 ]))), (1 ,)) cv2.fillConvexPoly(hull_mask, cv2.convexHull( np.concatenate((int_lmrks[17 :20 ], int_lmrks[8 :9 ]))), (1 ,)) cv2.fillConvexPoly(hull_mask, cv2.convexHull( np.concatenate((int_lmrks[24 :27 ], int_lmrks[8 :9 ]))), (1 ,)) cv2.fillConvexPoly(hull_mask, cv2.convexHull( np.concatenate((int_lmrks[19 :25 ], int_lmrks[8 :9 ], ))), (1 ,)) cv2.fillConvexPoly(hull_mask, cv2.convexHull( np.concatenate((int_lmrks[17 :22 ], int_lmrks[27 :28 ], int_lmrks[31 :36 ], int_lmrks[8 :9 ] ))), (1 ,)) cv2.fillConvexPoly(hull_mask, cv2.convexHull( np.concatenate((int_lmrks[22 :27 ], int_lmrks[27 :28 ], int_lmrks[31 :36 ], int_lmrks[8 :9 ] ))), (1 ,)) cv2.fillConvexPoly( hull_mask, cv2.convexHull(int_lmrks[27 :36 ]), (1 ,)) if ie_polys is not None : ie_polys.overlay_mask(hull_mask) print () return hull_mask
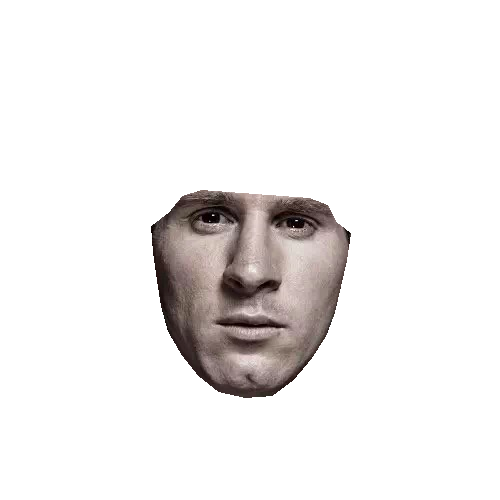
方法利用的就是opencv的convexhull得到凸包然后就可以抠出人脸区域。 得到掩模,这里使用两种方式来得到人脸区域 1. 将mask作为$\\alpha$通道,来控制图片区域的透明度,最后得到图片是4通道的
1
2
3
4
5
6
7
8
9
10
def merge_add_alpha (img_1, mask ): r_channel, g_channel, b_channel = cv2.split(img_1) if mask is not None : alpha_channel = np.ones(mask.shape, dtype=img_1.dtype) alpha_channel *= mask*255 else : alpha_channel = np.zeros(img_1.shape[:2 ], dtype=img_1.dtype) img_BGRA = cv2.merge((b_channel, g_channel, r_channel, alpha_channel)) return img_BGRA
分割结果
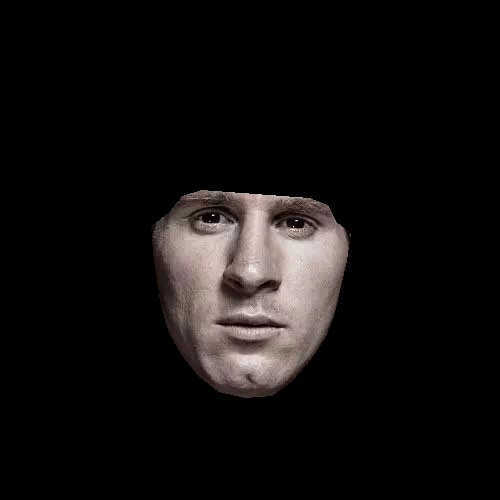
掩模与原始图像进行与运算,返回图像是三通道。
1
2
3
4
5
6
7
8
9
10
11
12
13
14
15
16
17
18
19
20
21
22
def merge_add_mask (img_1, mask ): if mask is not None : height = mask.shape[0 ] width = mask.shape[1 ] channel_num = mask.shape[2 ] for row in range (height): for col in range (width): for c in range (channel_num): if mask[row, col, c] == 0 : mask[row, col, c] = 0 else : mask[row, col, c] = 255 r_channel, g_channel, b_channel = cv2.split(img_1) r_channel = cv2.bitwise_and(r_channel, mask) g_channel = cv2.bitwise_and(g_channel, mask) b_channel = cv2.bitwise_and(b_channel, mask) res_img = cv2.merge((b_channel, g_channel, r_channel)) else : res_img = img_1 return res_img
分割结果为
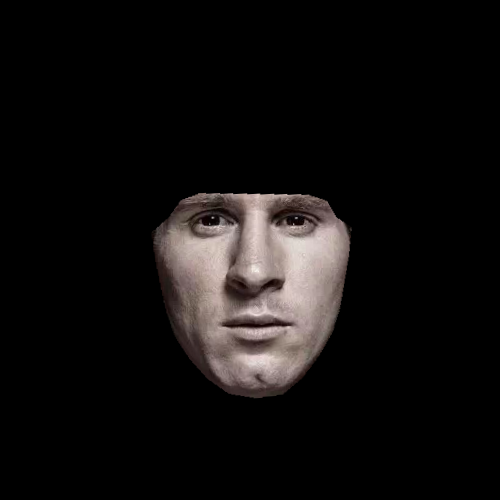
人脸对齐 思路比较简单,计算两眼连线与水平线的夹角,然后通过角度得到对应的旋转矩阵。对图片进行相应的变换。
1
2
3
4
5
6
7
8
9
10
def single_face_alignment (face, landmarks ): eye_center = ((landmarks[36 , 0 ] + landmarks[45 , 0 ]) * 1. / 2 , (landmarks[36 , 1 ] + landmarks[45 , 1 ]) * 1. / 2 ) dx = (landmarks[45 , 0 ] - landmarks[36 , 0 ]) dy = (landmarks[45 , 1 ] - landmarks[36 , 1 ]) angle = math.atan2(dy, dx) * 180. / math.pi RotateMatrix = cv2.getRotationMatrix2D(eye_center, angle, scale=1 ) align_face = cv2.warpAffine(face, RotateMatrix, (face.shape[0 ], face.shape[1 ])) return align_face
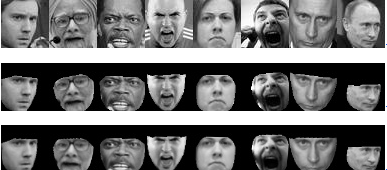
人脸对齐后如图 github 可以用以上方法对fer2013数据集进行预处理,如图所示。
 首先贴出python代码 ` ```python
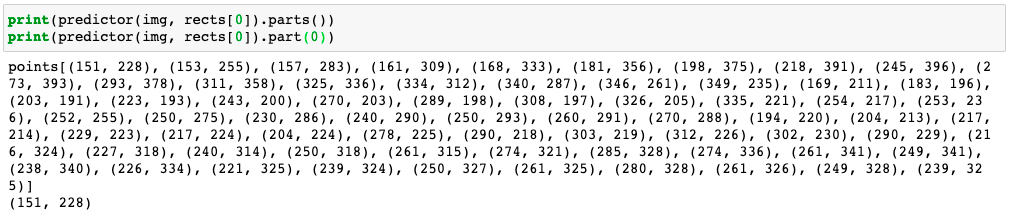 测试图片的原图与标注关键点后图片如下图所示。
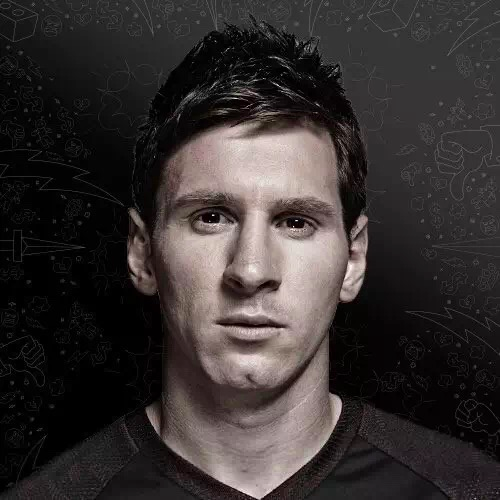

 这样就完成人脸检测—>人脸关键点检测—>人脸分割—>人脸对齐。 具体代码参照github 可以用以上方法对fer2013数据集进行预处理,如图所示。